www.portablefilmfestival.com
www.urbanjunkies.com
www.kultureflash.com
www.moviestorm.com
www.aswarmofangels.com
Friday, February 13, 2009
Friday, December 19, 2008
Account of casting decisions and storyboards.

Casting for us was rather easy because we only had one person to cast. But that meant that we had to think extra hard about whom we wanted playing that role. We spent a good amount of time on Google images looking for certain stereotypes. So we could get the face and the costume right.In the end we invited an actor that the school uses a lot called Russell Layton to be in our film. We paid him a standard day rate - which was ok as we split it between 4 people (about £35 each with travel and expenses) and managed to borrow most of the other stuff we needed. So the most expensive part of our production was our actor, so lucky we kept our action confined to a small room so we didnt have to go anywhere and cause greater expense.
 7-8
7-8

5-6


3-4

 1
1 - 2
- 2
These pictures are some of our original storyboards.
Friday, November 28, 2008
First lesson with Final cut pro
We used ADOBE Final Cut Pro (which is a non linear editing program) to edit our prelim task and it was difficult at first. Some of the things we learnt included how to make bins of clips, and how to edit them on a timeline, how to make rough cuts and add audio clips to other parts of the lines. Later we will experiment with the audio for these images also.


Thursday, November 20, 2008
Account of props and original location
What we needed was the right clothes and then some little other things to show of the character in his house - so costime and props were important to show personality and status of ouir main character.
For example the skull that we had against the wall and the other things to show that he had travelled to Africa or somewhere exotic that brought back the evil force.
Another very important prop that we did need was the photos that had the black lines on them so we could get the continuity correct. We got are production designer Elektra to make the butterfly photos on photoshop and printed them on photographic paper, then borrowed lots of props like trays and tweezars from the science lab, and borrowed some statues from a teacher.
THE CHEMISTRY LAB WAS OUR ORIGINAL
LOCATION BUT WE DECIDED IT
LOOKED TOO MUCH LIKE A
SCHOOL, SO LOOKED FOR OTHER ROOMS.


We were annoyed that are shoot day changed which made the chemistry lab unavailable, but in a way this was better as we ended up shooting at are second choice which was 15 mins drive in a school minibus away. We were lucky that are school sponsored this so we didnt have to pay for transport or a driver directly, and we lent the house for free through a friend of a friend.
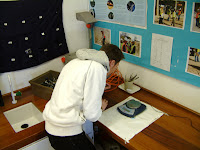
We used a red bulb and black bin bags to block the windows, and with props such as tray, tongs, string (for hanging photos), film negatives, projector, etc, the dark room looks very professional.
The photos on the wall shows his hobby clearly, and the souvenirs shows part of the protagonist’s personality which is like to travel around different places.
For costume, we prefer the idea of casual and a bit geeky T-shirt to show he's just a ordinary photographer, therefore evoke audiences' sympathy in this way or they would see him as an average guy.
For example the skull that we had against the wall and the other things to show that he had travelled to Africa or somewhere exotic that brought back the evil force.
Another very important prop that we did need was the photos that had the black lines on them so we could get the continuity correct. We got are production designer Elektra to make the butterfly photos on photoshop and printed them on photographic paper, then borrowed lots of props like trays and tweezars from the science lab, and borrowed some statues from a teacher.
THE CHEMISTRY LAB WAS OUR ORIGINAL
LOCATION BUT WE DECIDED IT
LOOKED TOO MUCH LIKE A
SCHOOL, SO LOOKED FOR OTHER ROOMS.


These are the photos of our final dark room at LEITH HILL with the 
 red head lights

 red head lights
We were annoyed that are shoot day changed which made the chemistry lab unavailable, but in a way this was better as we ended up shooting at are second choice which was 15 mins drive in a school minibus away. We were lucky that are school sponsored this so we didnt have to pay for transport or a driver directly, and we lent the house for free through a friend of a friend.
We used a red bulb and black bin bags to block the windows, and with props such as tray, tongs, string (for hanging photos), film negatives, projector, etc, the dark room looks very professional.
The photos on the wall shows his hobby clearly, and the souvenirs shows part of the protagonist’s personality which is like to travel around different places.
For costume, we prefer the idea of casual and a bit geeky T-shirt to show he's just a ordinary photographer, therefore evoke audiences' sympathy in this way or they would see him as an average guy.
Second camera lesson

In this lesson we had are first go at actually filming something we started by recaping the camera settings and then we took a look at are first storybord. We were then told about the rule of 180 degress. We went out and filmed a very simple story bored with no dialouge. it didnt take long and only involved a few shots.
Are first camera lesson.

In this lesson we took are first look at the camera that we will be using in are productions. we lernt fist how to unpack the camera and the stand and how to put all of this together. We then looked at the actuall camera and lesrnt how to change all the settings on the camera. Things like exposure, guide frames and the frame rate, which is 25 fps for video and 50 for film. Film is high res because it has more fps, but you cant use it more than once like with a digi tape.
Subscribe to:
Posts (Atom)